The garbage disposal is a kitchen appliance that helps in the disposal of food waste. It is essential to have a working garbage disposal. If your garbage disposal stops working, you can easily replace it. Below are basic steps to help you replace a garbage disposal on your own.
Step 1: Disconnect the Pipes and Remove the Strainer
The first step in replacing a garbage disposal is disconnecting the pipes from your old unit and removing them from your sink or countertop. You’ll need to turn off the main water supply valve and drain water in your sink or countertop. Below are simple steps on how to do it safely:
Turn off the power to the garbage disposal. Most garbage disposals have a switch on the bottom of the unit. If not, you may have to turn off your circuit breaker or flip a fuse.
Identify your garbage disposal. A nameplate or other identification label should provide clues to which piece of equipment you need to disconnect to remove it from its mounting ring.
Disconnect the discharge tube from the bottom of your unit by loosening its clamp and pulling it out through one end of the mounting ring. The opposite end will accept new gaskets. If you don’t know where this is located, refer to your owner’s manual for more details about removing and installing your device.
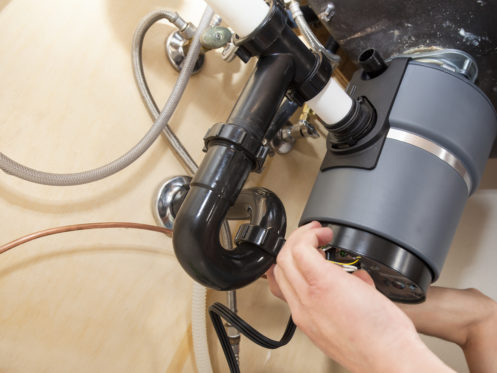
Release the old disposal from its mounting ring by pulling up on it until it comes free from its base plate at the bottom of your sink drainpipe (or wherever it connects with yours).
Release the old disposal from its mounting ring by unscrewing bolts or removing screws holding the plate to the motor housing unit (if there are other types of connection).
Disconnect the power source from the garbage disposal. Turn the device over, and check the bottom for the round or square faceplate. This serves as the electrical house cover. Remove the green screw from the faceplate and place the copper ground wire over it. To detach the colored wires from the primary power source, pinch the plastic wire connections.
Step 2: Replacing Worn-Out Mounting Hardware
There are several different parts to a garbage disposal. The most important thing to remember is that most of them must get replaced. The first step in replacing a damaged mounting assembly is to determine if there is any damage to the mounting ring and flange. It will need to be replaced if it has been broken or cracked.
The first step is to pull off the existing mounting ring. To do this, turn off the power to your garbage disposal and turn on the water supply to your sink. If necessary, turn off the water supply to your dishwasher and other sinks to prevent flooding if something fails. Loosen the nut holding down a sink flange with a wrench or pliers so it can be removed from its mounting location.
Remove the sink flange. With a flathead screwdriver, remove old sink flanges by pressing in on them with your fingers while they are still attached to their mounting hardware. Depending on what kind of garbage disposal you have installed in your kitchen, there may be more than one type of flange, but most will have two screws that secure them to their mounting holes in an outlet.
Install the new sink flange. Using a large wrench, loosen the bolts holding the sink flange to the sink. Remove the old sink flange. The old flange may be rusted, so use a pry bar or hammer to break it free.
Apply plumber’s putty. Once you have disconnected your sink flange and the drain line, remove any debris inside it. Use a rag or rag towel to wipe off any buildup of grease, soap scum, or other unwanted substances. Add a few drops of dishwashing liquid into this area to help loosen any remaining material from inside the pipe. This allows any loose material to pass through easier.
Connect the new mount. Slide the rubber gasket over the bottom of your new sink flange first, then a second metal flange, working in reverse order this time. Screws should be placed in each of the open screw holes after the new mounting ring has been positioned. With one hand holding the assembly in place, use the other to tighten the screws against the lower flange.
Step 3: Installing the New Disposal
Below are the tips for the final installation step.
Secure the replacement disposal onto the mounting ring: The mounting ring is a large ring that sits underneath your sink and holds the disposal. The new unit will be mounted on this ring. Make sure you secure it well and that it doesn’t move around during the installation process.
Reattach the electrical wires: The electrical wires for your disposal are located under a rubber cap attached with Velcro strips. They should be easily accessible when you remove this cap. Reattach them to their corresponding terminals on your new unit, then reconnect them to their corresponding terminals on your electric box.
Reconnect the discharge tube: Your new model may have a different discharge tube than your old one, so you’ll have to adjust it accordingly. First, undo any screws holding down rubber plugs or caps covering drain openings in your sink cabinet or under-counter drainboard (if applicable). Next, insert your new tubing into its designated opening until it stops against an obstruction, such as a dishwasher or garbage can (if applicable). Use pliers if necessary to remove any remaining obstructions from your sink cabinet.
To check for leaks, run water through the garbage disposal. Open the faucet and let the water flow for 15 to 20 seconds. Ensure no water leaks from connection points surrounding the new unit while running. You shouldn’t experience any issues as long as each component has been installed well. Use a line of Teflon pipe joint compound or a strip of thread seal tape to seal any little leaks you notice. Also, don’t forget to dry the plumbing fixtures before handling a leak so that the glue will adhere.
If necessary, trim the discharge tube. There’s a significant likelihood that the discharge tube won’t be the proper length to connect to the ground plumbing valve if you’ve upgraded to a larger disposal or one of a different kind. Fortunately, this is an easy repair; mark the area on the tube where it should align with the drain pipe and use a hacksaw to trim it to size. It should fit perfectly.
Step 4: Test the New Disposal
When you are done with the installation, turn the garbage disposal breaker to the “On” position. Return to the kitchen and turn on the disposal with the switch. Pay attention to the sound. No humming, grinding, or excessive vibration should be present.
Make sure there are no tools, screws, or other loose items in the sink that could ruin what you just fixed. They shouldn’t be able to tumble into the garbage disposal! If everything works fine, then you are good to go.
When to Bring in Professionals
Call a qualified plumber to look at the new disposal if it is making strange noises or doesn’t seem to be working properly. There could be a problem with the device’s internal mechanisms.
If you are looking for professional and reliable plumbing service in Newburgh, NY, you can count on Polar Plumbing, Heating & Air Conditioning. We are available 24/7 to help you with any of your plumbing and HVAC problems. Our team of professionals is highly skilled and experienced in all types of plumbing, heating, or cooling services, so we can handle any job that comes our way.